Showing posts with label Forensic Sculpture. Show all posts

Friday, January 13, 2017

Forensic Sculpture 2017 - Day 5

Forensic Sculpture - Day 5
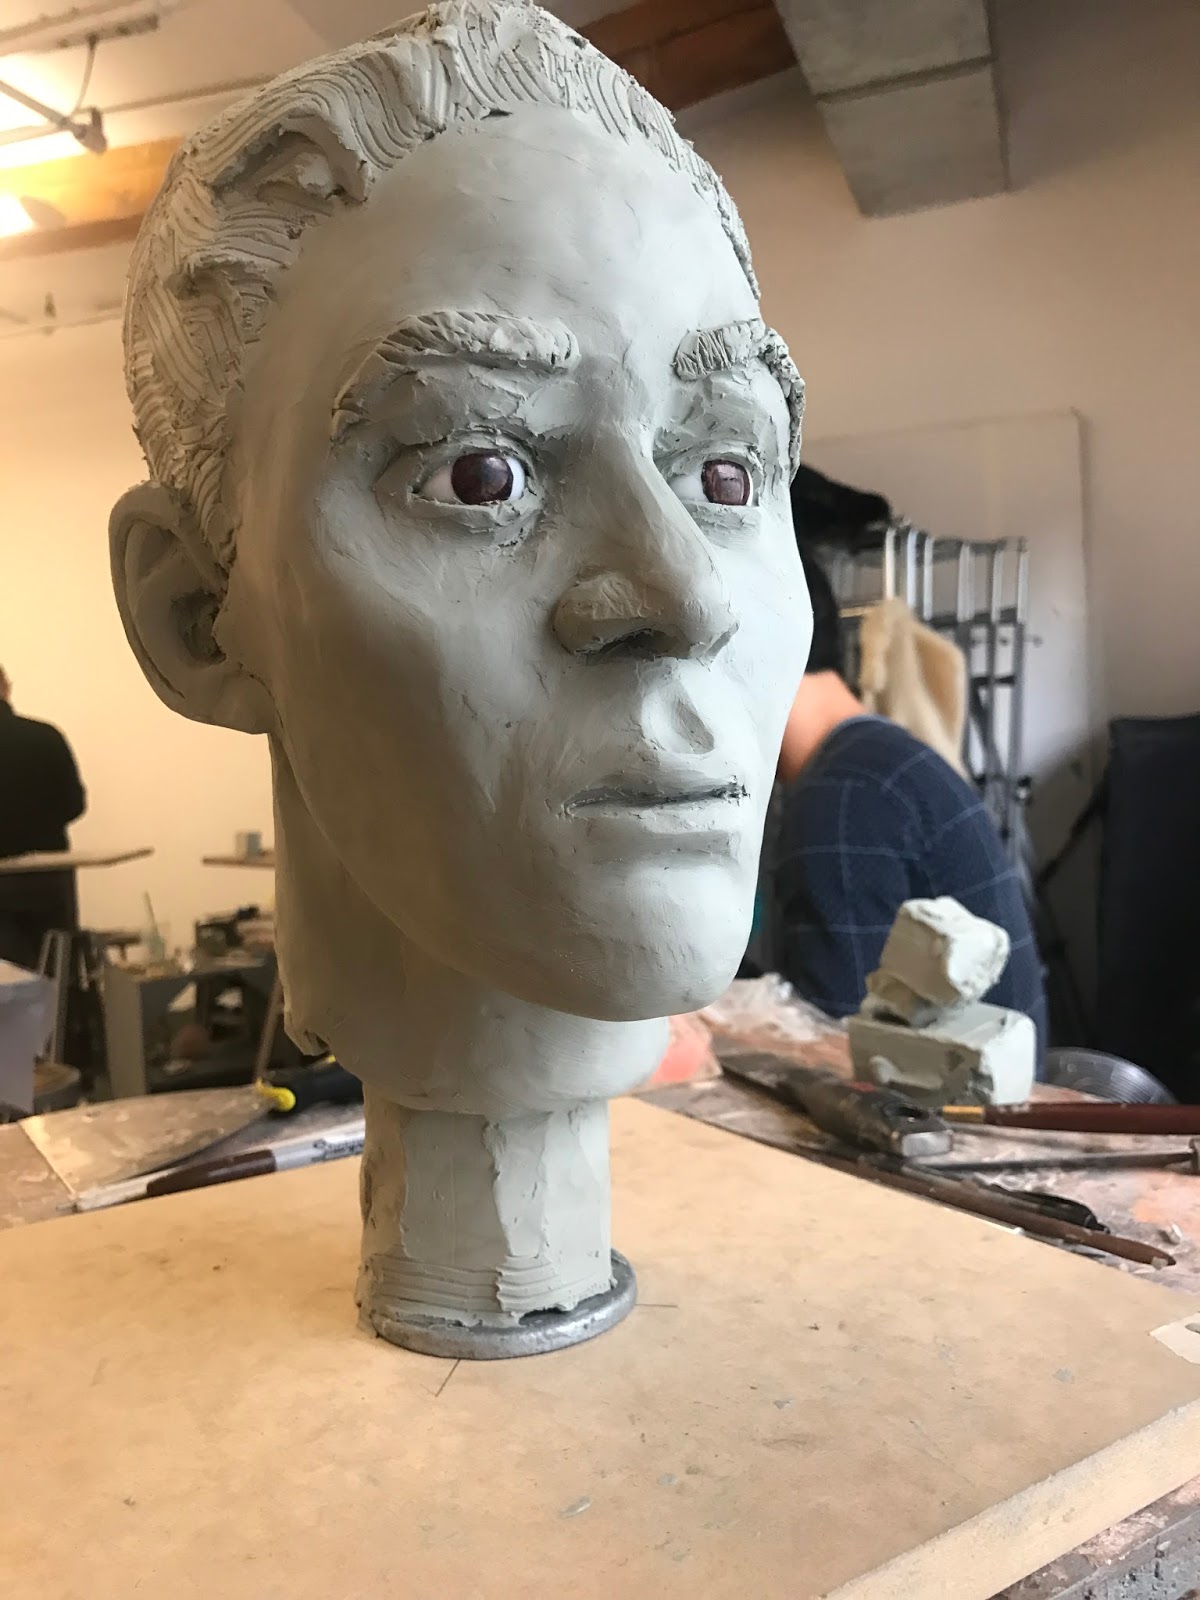
So the last day was a lot of finishing. Evening out the hair, carving the face then a lot of smoothing with my thumbs. (So much smoothing to make the texture of skin against the hair).

This is the completed sculpture.

I will re-post this initial information found about the person:

M-85-3894
Sex: Male 
Age: 18-25
Ancestry: White, including Hispanic 
Height: Approximately 5'7"
Tooth Loss: All missing teeth would have been present during life.
Damage: There is an autopsy cut along the cranium. The right zygomatic arch should be completely (the space is due to a 3-D printing error). There is missing bone associated with the nasal (top of the nose) that is the result of damage. 
Circumstances: Body found in 1985
Other information: Black, wavy hair approximately 3-4 inches in length.


There is the feeling of accomplishment after doing this class that is really hard to describe. I consider myself pretty much a secular humanist these days but find my thoughts keep returning to Catholic teachings about the Parable of the Talents.  This class is an opportunity to use my skills for a greater goal,  in this case giving a face to an unknown person and hopefully finding this person's identity. 


So this is the final step of the process where the clay sculpture is scanned into the computer.  Again this class was a lot of fun. I would do it again in a heartbeat.

Thursday, January 12, 2017

Forensic Sculpture 2017 - Day 4

Forensic Sculpture 2017 - Day 4
Day 4 is always the magic day where there is the likeness of a person gazing back at you. The main parts were adding the mouth and the rest of the tissue for the lower jaw, then working on the hair.

I ended really late today, after 9pm. I lost track of time and there was a lot that had to be done.

The first job was adding the mouth to the sculpture. The inside of the iris is the general marker for the ending of the mouth's structure. The lip size is then determined by the size of the front teeth's enamel. We then placed them with a toothpick and smoothed them to the rest of the face.


With the lips complete, we then worked on the rest of the tissue depth markers.


Next, we added ears to the sculpture. I did not have enough time to carve them nicely so they were just blocked in for a while.

I filled in the markers roughly, then distinguished the parts of the face I learned from Che's Ecroche Class (Mouth Muzzle and rest of the face). I also started to add the hair. 


When working on the hair, I realized my first pass was not nearly enough, so I added a lot more. It was also getting late and so I stopped for the day.

Wednesday, January 11, 2017

Forensic Sculpture 2017 - Day 3

Forensic Sculpture 2017- Day 3
So Day 3 of the workshop. We worked on the eyes and the nose today. The process is very linear in a way as we are working down the skull adding features from top to bottom, working from the base levels to the surface structures very systematically.  Taking this class a second time really lead me to appreciated this.

The likeness is also starting to emerge from the clay.  It really is remarkable. 


This is where we left off yesterday.  Filling in around the eyes was the first step of the day, reinforcing the area around the eyes and readying for the eye lids to be added.  


Then we added the eyelids. There is a depression in the eye socket that corresponds to how the eyelid folds on the eye. This skull had a lateral depression, so it meant the eye lids would pull up on the outside of the eyes.


With the eyelids completed, the next step was to work on the nose.


This is done by using toothpicks to determine the shape of the nose based on the structures of the skull. Using this gives an idea of the general size of the nose, but tells very little about the structure of the nostrils of the bulb of the nose itself. The instruction was then to make it very generic other then the size of the nose.   


After completing the nose, we ended day 3.

Tuesday, January 10, 2017

Forensic Sculpture 2017 - Day 2

Forensic Sculpture - Day 2
So Day 2 of the Forensic Sculpture Workshop. Above is where we ended after Day 2. You can see that we added the eyes and the tissue depth markers.

Even at this stage, I am struck by how narrow the sides of this person's face was. I even got a comment from the forensic anthropologist. He also commented that the body was found with a substantial amount of hair. 

So the main part of the class was the adding of the tissue depth markers to the skull


Here is a website with the tissue depth markers we used (So the internet literally has everything). Putting them on a piece of paper made it way easier to keep my place when working. This was a real improvement from last year.


Here is the skull with the markers in place.

The next step was to create the eyes.

The Eyes were just created with glass marbles and brown and black sharpies. It was kind of amazing how simple yet effective this was.


So the final step for the day was to place the eyes in the skull. The main rule for placing them was to center them in the eye socket. Depth in the socket was my main problem. The Eye has to protrude from the skull enough to block a putty knife from resting across the socket diagonally. The real challenge was getting both eyes symmetrical and embedded at the same level.


Monday, January 9, 2017

Forensic Sculpture 2017 - Day 1

Forensic Sculpture - Day 1

So I decided to retake the Forensic Sculpture workshop at the Academy. I had a blast last year, learned a lot, and felt like my artistic skill was being used for a novel purpose. This year again, I will be creating an accurate skull-to-face reconstruction.

So this is the information about my Skull:

M-85-3894
Sex: Male 
Age: 18-25
Ancestry: White, including Hispanic 
Height: Approximately 5'7"
Tooth Loss: All missing teeth would have been present during life.
Damage: There is an autopsy cut along the cranium. The right zygomatic arch should be completely (the space is due to a 3-D printing error). There is missing bone associated with the nasal (top of the nose) that is the result of damage. 
Circumstances: Body found in 1985
Other information: Black, wavy hair approximately 3-4 inches in length.

I was shocked by how much I had forgotten from the first class, so I am going to use this blog to document the steps of forensic sculpture. 


The skull stand is made up from bits of hardware screwed together with a piece of metal sandwiched between. The idea is to create an adjustable stand for the skull's palette.

After the skull stand was complete, we now begin to prep the skull. First step is to connect the jawbone to the skull. This is done by recreating the cartilage that connects these two bone together, using super glue and cotton swabs. The super glue fumes from the almost 20 skulls in the tiny room got a little too much for me to handle. I had to step out of the class for a bit to catch some air. 

After the fumes subsided, stabilizing my the skull in the stand was the next step.  This is done simply by creating a clay plug around the base of the stand.


Now the skull is stable and passed the requisite test of turning the whole structure upside down and seeing if it would fall off.

Next, we covered the pipe and began to fill in the mouth. That was where we ended Day 1.

Did I mention I had a blast last year in this class? Here I am in the foreground, working the class:


Friday, January 22, 2016

Forensic Sculpture - Day 5

Final Sculpture

After talking to some of my friends about this. I may have made her older then I should.

My effort today was to de-age her today so that she fits comfortably in the 30-50 year age range.

It was actually funny how I had to go about it. There were a number of things I had to do.

Day 4 
The obvious areas of this sculpture that are making it look older are the bags under the eyes, the prominent laugh lines, and the bushy eyebrows.  There are also some other more subtle areas that I can add clay to to make it appear fuller.

A classmate got into a discussion about a conversation with her dermatologist about injecting fat into her face to make her look younger. There were areas of the face, that if filled out, make the person look younger. I was concerned with making her look petite, but it ended up making her look wiry. 

So I had to do some plastic.... No, plastacine surgery. 

Day 5
So this is the sculpture after adding more clay to the eyes and lips. One comment was she looks like the daughter of my original sculpture, so she is comfortably in the the 30-50 range.

This was an awesome experience and class. I would do this again in a heartbeat. I was amazed by how quickly the time flew by. We were sculpturing for 6 hours a day and the time just flew by. I am really happy with the final sculpture and hope that it helps identify this missing person.

Thursday, January 21, 2016

Forensic Sculpture - Day 4

End of Day 4
Today we added lips, eyebrows and hair.

Magic day is right. It is really coming together.

This course seems like the corollary to the artistic theory for the New York Academy of Art.  We learn anatomy and the body structure so that we can make more striking figures. So when we look at a human model or a photograph we can infer the anatomy to define the forms. In this class we are given the structure (the skull)  and then asked to create the portrait from that information.


There is not a lot of information about the lips recorded in the skull. There is an average correlation between lip size and enamel size and you can get the general width from the eye placement.  I made them subtle, as a lot of lip definition is from a color change not necessarily a form change.


So the physical remains were specific about a hair length. It also specified a style-- hair in a scrunchie. I quickly blocked it in and made the general shapes.

Joe recommend that we text the photo of the skull to people and ask for the age, gender and race of the subject to see if our sculpture is in the ball park.

Wednesday, January 20, 2016

Forensic Sculpture - Day 3

End of Day 3 
 Today we added eyelids and the nose. Wow, the sculpture is starting to look like a person.
Added Eye lids
Adding the eyelids was more of a technical challenge then anything else. The skull has information as to their general shape. The connection to the upper lid is determined by a divot in the skull. You can also find the connection point on either side of the eye in the skull. Creating the fold while maintaining the shape of the skull's eye socket was my main objective.

There is a lot of emotion in the eyes of this piece. People have commented to me about it throughout the process.


Adding the nose was a simple process, although like the ears, a lot of the individual information is lost. I was actually surprised by how much information was there. The general shape is determined by an intersection of two bones on the skull; you can also determine the nostril wall size and that gives a good clue about the width of the nose,

This woman had an obvious broken nose. I was struggling with how prominent to make it. I spent a lot of time looking at pictures of women with broken noses. I should step back and say do NOT google "Women with broken noses" on Google image search. I was horrified after doing that and quickly changed it to "Women with healed broken noses."

I was told that tomorrow is the "magic day" where the sculpture begin to take on a life of its own. I can already see it beginning here and I am really excited.

Tuesday, January 19, 2016

Forensic Sculpture - Day 2

End of Day 2
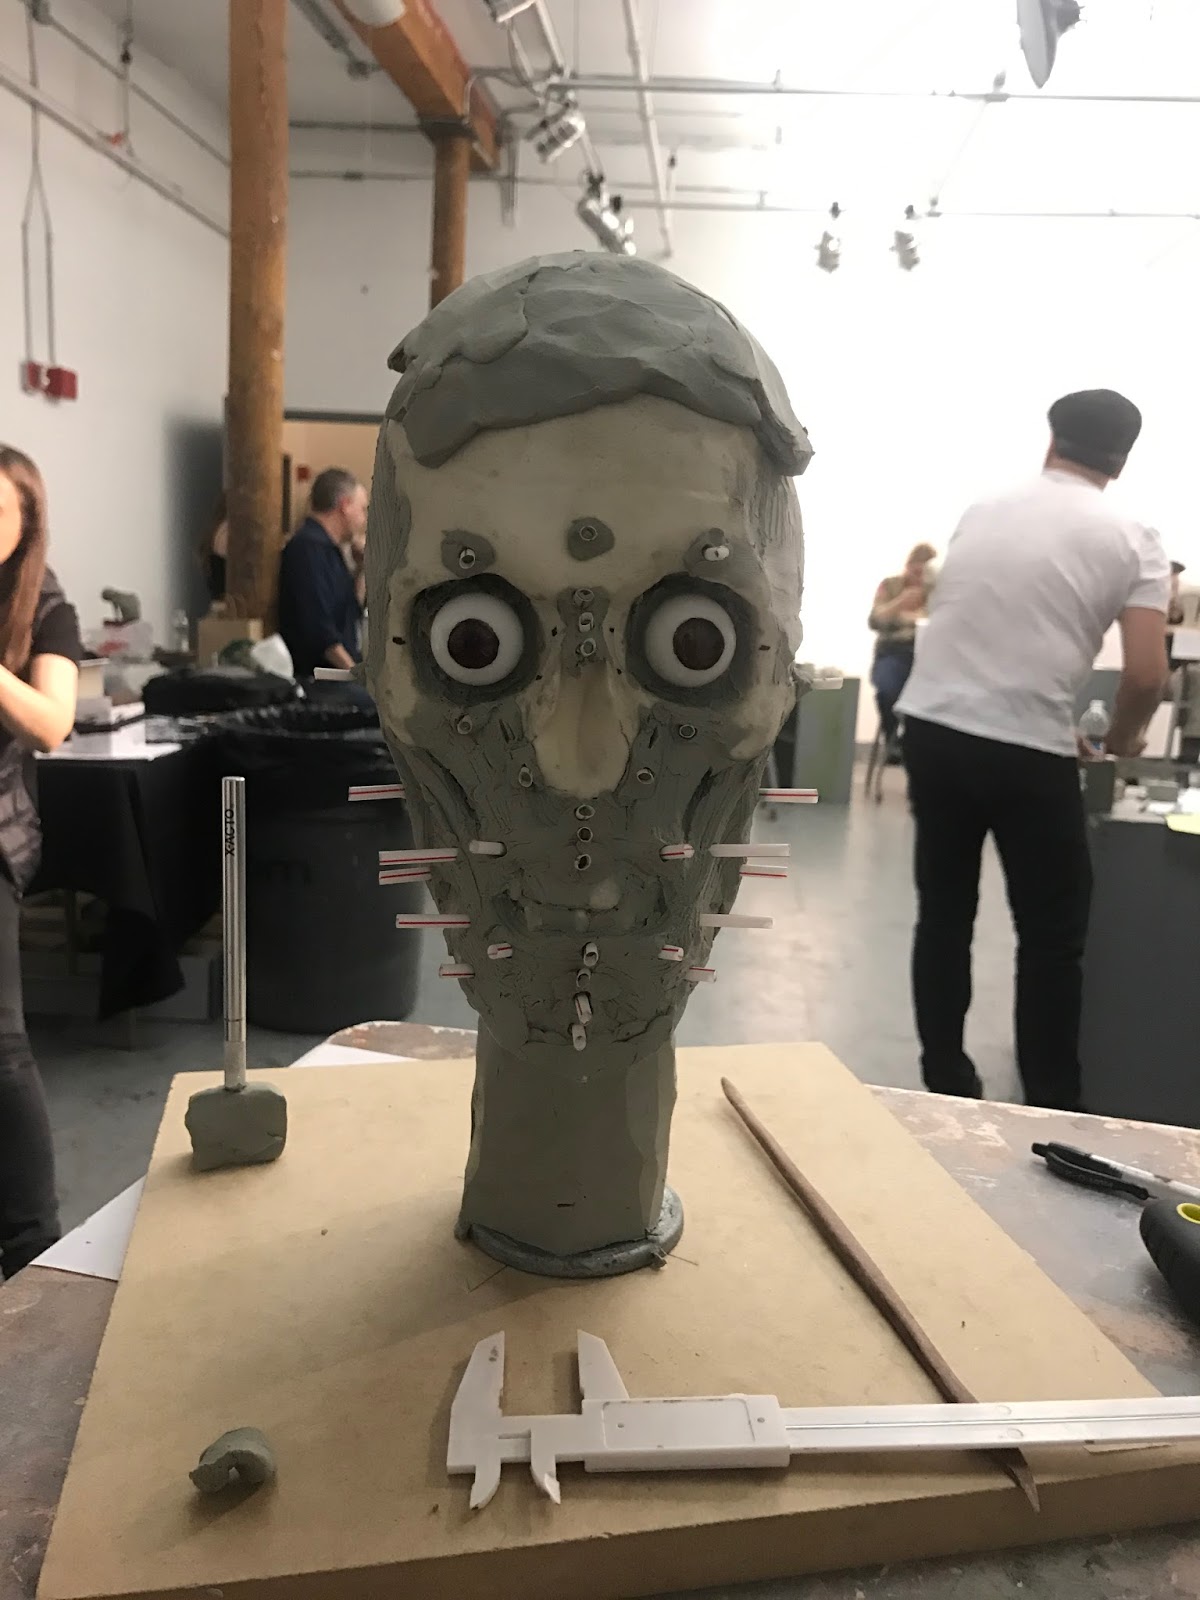
Lots of work done today. Although looking at the final picture the sculpture looks like something out of a haunted house.

Today we added the tissue depth markers, filled in the skull, made the ears and made the pupils.

Detail of the tissue depth markers of the face. 

Tissue depth markers are the straws placed around various points of the skull.  They represent the average amount of flesh in a given area of the skull. Our instructions here were to go from specific to more general when filling in the tissue depth marks. The tissue depths of higher on the face are pretty universal, as you get lower on the face the averages become less reliable.

It is kind of obvious when you think about it most people from above the cheekbones are very similar and there is a universality to human faces. As you get lower in the face differences in gender, race and weight make a big difference.

So Joe's instruction is to go with the face you're creating when deciding to fill in the lower tissue depth markers. He even pointed out that following the tissue depth markers blindly lead you to create a large-jawed sculpture.

I had a little problems with this because of the skulls missing teeth. The Tissue markers in certain places were difficult to place.


There was some time so we filled in the scalp of the piece. It was a simple process of using the top of the head marker and extending it to the forehead marker and the zigomtic arch (cheekbone).


Today we also added the ears to the piece. There is not a lot of information about the ears recorded on the skull. We know there general size, direction they are angled and if the ear lobes are connected or not. While ear formations  are unique to each individual (almost like a fingerprint) used in the identification of missing children most of that information is loss. So we have to include the ears but they need to be rather generic.

It is amazing how different all the busts look around the room. The individuality of each of the skulls is starting to appear. It's amazing how quick that happened.

Monday, January 18, 2016

Forensic Sculpture - Day 1


End of Day 1
So I enrolled in a Forensic Sculpture Class the week before school started up. It sounded interesting and I thought it would be a great learning opportunity. It also would help get me into the school routine before the spring semester starts up again.

The instructor is name Joe Mullins. He seemed up beat but serious about the class. He led us through each part of this process.

First, we were given a presentation by a forensic anthropologist. On the table were 15, 3-D printed skulls.  When looking at the table of 3-D printed skulls, I was struck with how similar they all looked. There were minor superficial differences but overall they all looked similar.

So we each choose a skull at almost random,

Skull #5
Skull #5 (Orange County, CA, NamUs #12250, case 14-00097-w1)
Estimated Age: 30-50
Race/Ancestry: White
Sex/Gender: Female
Case Description:
- Skeletonized body found in January 2014 in Caspers Wilderness Park (rural southeast area of Orange County, CA)
- She has shoulder length wavy Dark Brown Hair with light colored Highlights
- Size small Windbreaker jacket with "Coach Williams" Embroidered on the front and also a ball (e.g, volleyball). Athletic yoga style spandex pants. Pinkish short sleeved tank top t-shirt. A bright green Hair scrunchie band.
- There is a healed fracture to the nose with obvious angulation to the right.
- Any missing Anterior Teeth would have been present during life.

The first step was to do a rough block in of the facial muscles. Even with the decreased resolution of the 3-D print, when you ran your fingers across the skull you could feel where the muscles attached to the face, Just adding the facial muscles and you could immediately see the differences between the skulls. It took very little to reveal the individuality. It was remarkable to see it happen.

Adding the facial muscles to the skull
The last thing we did on day one was to add the glass marbles as the eyes.

The sculpture now looks like something out of a horror movie.