 |
| Forensic Sculpture - Day 1 |
So I decided to retake the Forensic Sculpture workshop at the Academy. I had a blast last year, learned a lot, and felt like my artistic skill was being used for a novel purpose. This year again, I will be creating an accurate skull-to-face reconstruction.
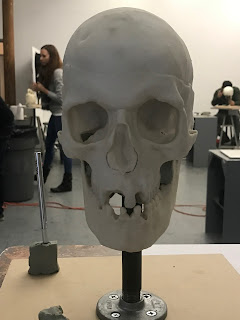
So this is the information about my Skull:
Sex: Male
Age: 18-25
Ancestry: White, including Hispanic
Height: Approximately 5'7"
Tooth Loss: All missing teeth would have been present during life.
Damage:
There is an autopsy cut along the cranium. The right zygomatic arch
should be completely (the space is due to a 3-D printing error). There
is missing bone associated with the nasal (top of the nose) that is the
result of damage.
Circumstances: Body found in 1985
Other information: Black, wavy hair approximately 3-4 inches in length.
I was shocked by how much I had forgotten from the first class, so I am going to use this blog to document the steps of forensic sculpture.
The skull stand is made up from bits of hardware screwed together with a piece of metal sandwiched between. The idea is to create an adjustable stand for the skull's palette.
After the skull stand was complete, we now begin to prep the skull. First step is to connect the jawbone to the skull. This is done by recreating the cartilage that connects these two bone together, using super glue and cotton swabs. The super glue fumes from the almost 20 skulls in the tiny room got a little too much for me to handle. I had to step out of the class for a bit to catch some air.
After the fumes subsided, stabilizing my the skull in the stand was the next step. This is done simply by creating a clay plug around the base of the stand.
Now the skull is stable and passed the requisite test of turning the whole structure upside down and seeing if it would fall off.
Next, we covered the pipe and began to fill in the mouth. That was where we ended Day 1.
Did I mention I had a blast last year in this class? Here I am in the foreground, working the class:


No comments:
Post a Comment